Hi Friends,
Few days before I was doing installation of Ax2012 Retail feature in my
local m/c.
I like to share my experience with you.
1. Architecture of the
Microsoft Dynamics AX Retail 2012 R2
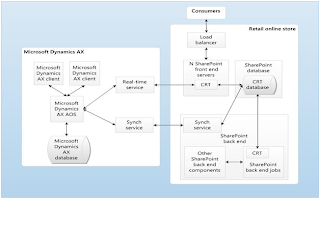 We need to understand the
modify architecture of Ax2012 R2 retail.
We need to understand the
modify architecture of Ax2012 R2 retail.
Main Components
1.
Retail Headquarters.
2.
Commerce Data Exchange: Real-time Service (previously
known as transaction service in Ax2009)
3.
Commerce Data Exchange: Synch Service.(previously known
as Store connect in ax2009)
4.
Retail POS.
5.
.net Business connector.
Helping Component to do the configuration:
1.
Retail store database utility.
2.
Retail SDK.
3.
Retail online channel.
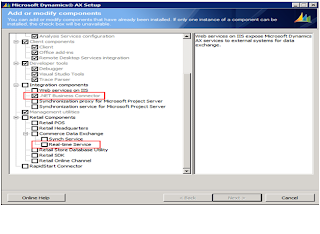
Open the Ax2012 R2 setup file and run (Before that Ax2012 R2 basic
application should be install in your m/c).
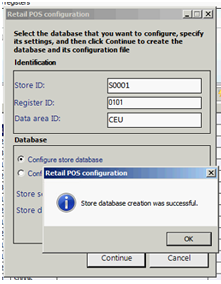
Provide the name of the store DB and configure.
Same way do it for offline store DB.
Error: While configuring synch service you might get the following
error.
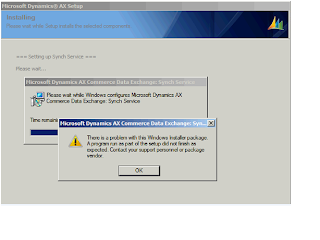 Solution
: Don’t configure the Synch service in setup time do it
manually after successfully installation of all the retail components.
Go to the Programs>MicrosoftDynamicsAx2012> Retail store database
utility
Open it and provide the below information to configure the store.
Don’t try to configure the offline DB after this because it will throw you
an error.
Error: Store can’t not be found.
Reason: There is no data at this moment in the Store DB.
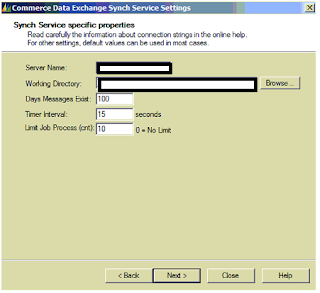
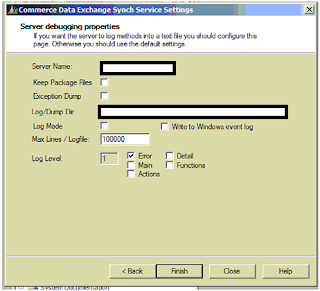
Configure the Synch service.
Go to the Programs>MicrosoftDynamicsAx2012> Retail synch service
setting.
When you click add the server, it will prompt with Create a message
database.
It will ask the database location and credential.
After successfully create of message DB, start the service and do the below
setup.
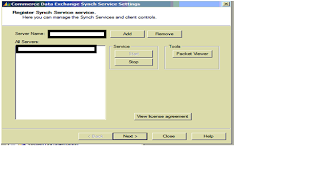
Check that all the services are running stage or not.
 Error
Error: Sometime the Synch service shows starting stage and it remain
unresponsive
You can’t stop/start the service from here.
Solution: Go to the Task Manager and check the Service Processor ID.
Stop it from here and start.

Open Ax2012 R2 application do the following setup:
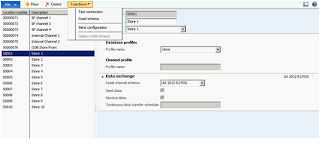
1. GO to the Retail>setup>Retail Scheduler>Channel integration.
Open AOS Profile
2.Open the Database profiles.
3.open the Synch Service.
Sometime we will get the following issue while doing test
connection check.
Reason:
Synch service is not started or we are not pointing the
right Synch service or firewall related issue.
Check the setup and see the event viewer for more details.
Go to the System Administration>setup>Initial
checklist>
Go through all the step, main important is the schedule
redeployment.
If it fails to insert certain data in some specific tables
of Retail Store db, then we need to do it manually.
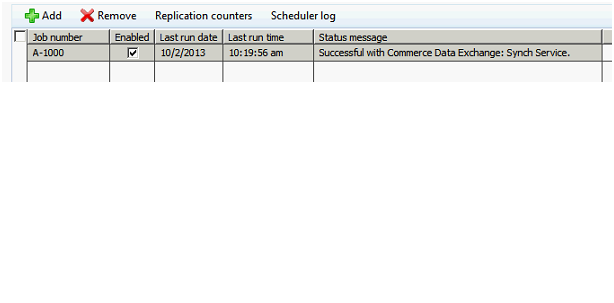
Go to the Retail>Periodic>Distribution schedule
Run the N-jobs
3 mandatory jobs need to be run 1st
1. N-1095
2. N-1090
3. N-1070
Then what are N- jobs you want to run ,run directly.
Please check the below status once run the job.
Go to the Programs>MicrosoftDynamicsAx2012> Retail store database
utility
Open it and provide the below information to configure the store.
Configure offline DB.
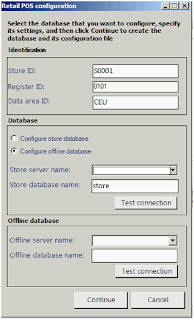
You are ready to open the POS.
To configure the real time service you can follow the below link, it is
quite helpful.
But I like to add some common troubleshooting on top of the above post which
I faced while creating the web service.
When you open the windows power shell open with
Administrator and never use x86 power shell. Otherwise unable to install the
Script in powershell, everytime it will fail.
Enter
Set-ExecutionPolicy
Unrestricted –Force before the start any installation .\InstallCommerceDataExchangeRealtimeService.ps1
3. Be careful with Binary source path.
a.
C:\Program Files (x86)\Microsoft Dynamics
AX\60\Commerce Data Exchange\Real-time Services\6.2\ \
4.
ServerCertificateThumbprint:
You should remove the spaces from the 40-character string. Every time enter the value manually. Otherwise you will
face the issue while opening the web service.
If
you successfully install and configure the web service it should open like
below.
For
any other errors please check the below link.
Configuring the Real-time Service
in Retail Headquarters
Now that we have confirmed the
Real-time Service Web service is working correctly, we need to configure it in
Headquarters and push it down to the POS.
In Dynamics AX navigate to Retail
> Setup > Retail scheduler > Channel integration > Real-time
Service profiles.
As in previous versions, the
Real-time Service profile is assigned to a specific register. Navigate to
Retail
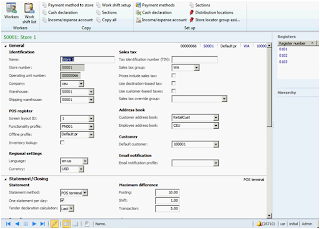
> Setup > POS > POS registers and open a register. The
profile you created should be assigned under
General > Profiles:
Basic functional setup:
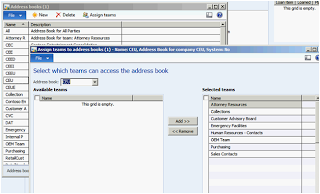
1. Do the setup of the Address book and a warehouse which is link with a
store.
2.
Go CEU/Human resources/Common/Workers/Workers
Create your own worker.
Enter the Address books.
Go to the Retail Tab
Do the below mandatory setup.
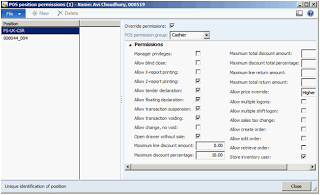
Set the POS permission.
3.
Go to the retail store and create your own store.
CEU/Retail/Common/Retail channels/Retail stores
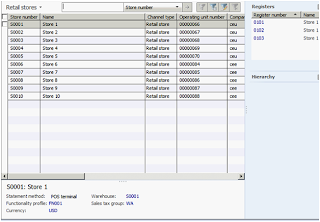
Add the worker in the store through employee address book.
Do the Setup of the Distribution Location under Retail>setup>retail
scheduler
If anyone is facing any problem on
following the above steps please let me know.


